How to use Meta Business Suite in 2026 starts by logging in at business.facebook.com and selecting the correct business portfolio. Connect your Facebook Page and Instagram account, then use Planner or Content to create and schedule posts or Reels. Manage messages and comments inside Inbox, track reach, engagement, and WhatsApp clicks in Insights, and boost high-performing posts for more visibility. For best results, enable Pixel tracking, connect WhatsApp, and secure your account with two-factor authentication.
Table of Contents
Social media has transformed how businesses connect with customers, making platforms like Facebook and Instagram essential for building brand trust and visibility. Meta Business Suite lets businesses manage ad accounts, Facebook Pages, Instagram profiles, and team access—all from one central dashboard.
This free tool helps marketers run ads more efficiently, manage content easily, and grow a stronger online presence.
In this guide, you’ll learn everything you need to know about using Meta Business Suite to manage and scale your social media marketing effectively.
What Is Meta Business Suite and Its Features?
Meta Business Suite is a set of tools designed to help businesses manage and grow their presence on Facebook. It brings everything you need into one dashboard, making social media management simpler and more efficient.
Key features:
- Ads Manager lets you create, manage, and track Facebook ads, including targeting the right audience and measuring results.
- Pages Manager lets you manage your Facebook Page by posting updates, replying to comments and messages, and monitoring performance.
- Insights lets you view analytics such as reach, engagement, and audience demographics to understand what content performs best.
You don’t need to use every feature, but using them together gives you a clearer picture of your performance and helps you get better results from Facebook marketing.

Why Should You Use Facebook Business Suite?
Facebook Business Suite helps business owners manage Facebook more easily and effectively. Here’s why it’s worth using:
1. Reach More People
Facebook has billions of active users, and Business Suite lets you target the right audience so more potential customers can see your products and services.
2. Save Time and Money
You can manage ads, Pages, and insights in one place without hiring extra help, making your workflow faster and more cost-effective.
3. Track Your Results
Built-in Insights show what’s working and what’s not, so you can focus on strategies that bring real results.

How Is Facebook Business Suite Different from Other Platforms?
Facebook Business Suite is built specifically for businesses, which sets it apart from many other platforms. All the tools inside the suite are designed to help businesses manage, grow, and market their presence on Facebook more efficiently.
If you’re used to switching between separate apps to manage Pages, messages, and ads, Business Suite brings everything into one place. This not only saves time but also creates a more streamlined and organised workflow.
Another key difference is that Facebook Business Suite includes powerful tools such as Ads Manager, Pages Manager, and Insights. On many other platforms, similar features are either limited or only available through paid plans, often at a premium cost.
Facebook Business Suite is also completely free to use, while many third-party social media tools require monthly subscriptions.
Most importantly, Facebook remains one of the largest social platforms in the world. As of the fourth quarter of 2021, Facebook had approximately 1.93 billion daily active users. For business owners, this means access to a massive and active audience. If your customers are already on Facebook, using Business Suite gives you a practical way to reach them, promote your brand, and grow your business in one place.
How to Start Using Meta Business Suite
Getting started with Meta Business Suite is straightforward. To begin, you’ll need to set up your account, complete your business profile, and familiarise yourself with the dashboard.
Create an Account and Set Up Your Business Profile
Visit the Meta Business Suite website and log in using your Facebook credentials. If you don’t already have a Facebook account, you’ll need to create one first.

Once logged in, you’ll be guided through the business setup process. Enter your business name and select the primary Facebook Page you want to manage.
If you don’t have a Facebook Page yet, you can create one during this step.
Add Your Business Information
Next, fill in your essential business details, including your business email address, phone number, and physical address. Make sure all information is accurate and up to date, as it may be visible to your audience.
Upload a clear, high-quality profile picture and cover photo that reflect your brand identity.
Then, go to the About section and complete your business description, operating hours, and any other relevant details. This helps customers understand what your business offers and how to reach you.
For added security, enable two-factor authentication in the Security section of your account settings. This helps prevent unauthorised access to your business account.
How to Navigate the Meta Business Suite Dashboard
The Meta Business Suite dashboard can be overwhelming at first look. Here’s what’s most important:
- Home: Your main overview page. It shows content performance, recent activity, a to-do list, and quick shortcuts for creating posts or ads.
- Notifications: Displays recent interactions such as comments, likes, and messages from your connected Facebook and Instagram accounts.
- Inbox: A unified inbox where you can manage messages, comments, and reviews from Facebook, Instagram, and WhatsApp in one place.
- Content: Create, edit, schedule, and manage posts and stories for Facebook and Instagram.
- Planner: A calendar-style view that shows your scheduled posts, stories, and ads, making it easier to plan content ahead of time.
- Ads: Manage advertising campaigns, create new ads, set budgets, and define audience targeting for your business.
- Insights: View detailed performance data, including reach, engagement, and follower growth, to understand how your content and ads are performing.
- Settings: Control account preferences, user roles, permissions, and third-party app integrations.

You can also explore the All tools section to access additional features such as audience management, lead generation tools, and A/B testing.
How to Schedule Content in Meta Business Suite
To schedule a post using Meta Business Suite, follow these steps:
You can create and schedule content from several sections in your dashboard, including Home, Content, or Planner, depending on how you prefer to work.


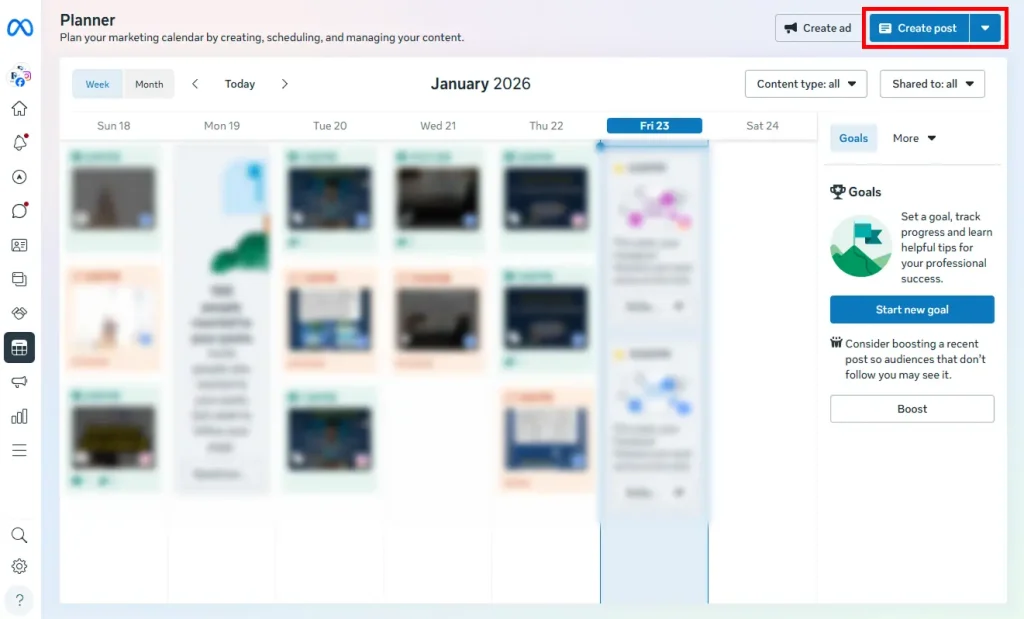
Choose where the post should be published: Facebook, Instagram, or both platforms at the same time.

Fill in your post details, such as the caption text, images or videos, and add relevant tags or location information if needed.

If you need to adjust your media, hover over the uploaded image or video and click the Edit option to make changes.

Use the preview panel on the right to review how your post will appear. You can compare Facebook vs Instagram views, as well as desktop vs mobile layouts.
Decide whether you want to Boost the post. Boosting turns your post into a paid advertisement to reach a wider audience.
When everything looks ready, select Schedule to publish later, Publish to post immediately, or Finish Later to save it as a draft.

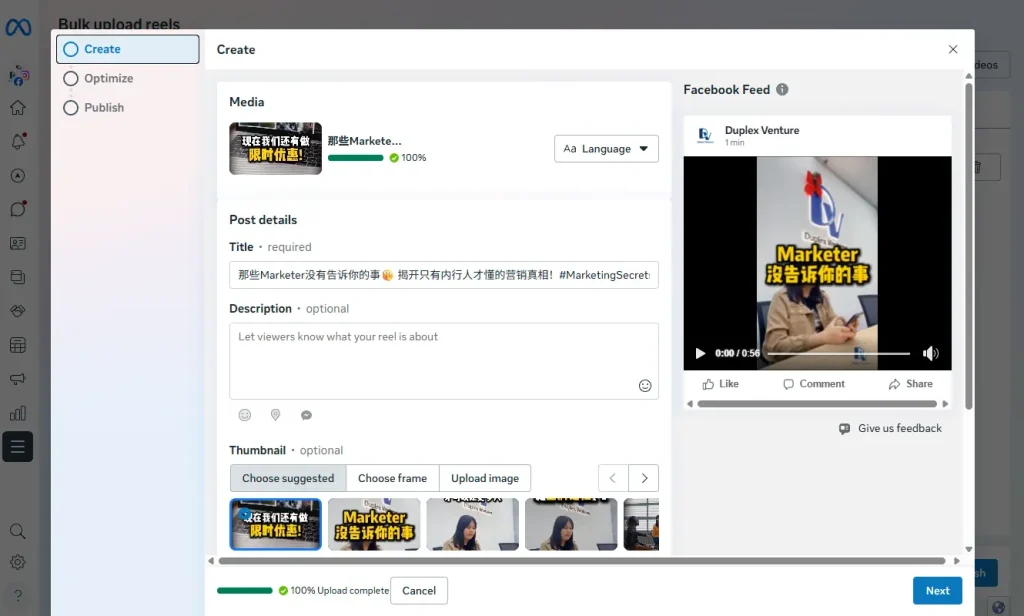
Create and Schedule a Reel
To create and schedule a Reel for Instagram or Facebook, follow these steps:
Click Create Reel, which is usually located next to the Create post button in Meta Business Suite.
Select where you want the Reel to be published: Facebook, Instagram, or both platforms, by choosing the correct accounts under the Share to section.
Upload your content by clicking Add video or Add photos. Keep in mind that photo-based Reels are currently not supported on Instagram.
In the Reel details area, write an engaging caption that clearly explains your content and encourages viewers to interact. Add relevant hashtags to help improve reach and discovery.
Choose a cover image for your Reel by selecting one of the suggested thumbnails or uploading a custom image.
If the Reel is a collaboration, enter your collaborator’s name or profile URL in the Collaborator section. An invitation will be sent automatically, and you can also invite them manually.
Click the Next button to proceed.
On the next screen, you can add trending music, adjust audio, and apply additional edits to enhance your Reel.
If you need to fine-tune your visuals, use the Edit button to modify the uploaded media.
To promote your Reel as a paid campaign, select Boost to turn it into an advertisement.
Once everything is ready, choose Share Now to publish immediately, Schedule to post later, or Finish Later to pause your work (note: Instagram Reels cannot be saved as drafts, only Facebook Reels can).
Finally, you can enable features such as Remixing or audience Gifts, and decide whether your Reel is shared publicly or limited to a Restricted audience.

Use Facebook Business Suite to Boost Your Business
Ecommerce is growing fast in Malaysia and more customers are buying online every day. If your business is not selling online yet now is a good time to start. At the same time competition is getting stronger so it is important to make your brand stand out and stay visible.
One practical way to do this is by building your social media presence especially on Facebook. Many Malaysian SMEs use Facebook daily to connect with customers answer enquiries and promote products. That is why Meta created Facebook Business Suite to help business owners manage everything more easily in one place.
Instead of using different tools for posting replying messages checking insights and running ads you can handle all these tasks inside Business Suite. This makes daily work simpler saves time and helps you stay more consistent with your marketing.
If you want a clearer workflow better control and more chances to turn followers into enquiries Facebook Business Suite is a good place to start for your business.
Frequently Asked Questions
What is Facebook Business Manager?
Facebook Business Manager lets you manage Facebook Pages, ads, Instagram accounts, and business assets in one place. You can also control who has access to what.
What’s the difference between Business Suite and Business Manager?
Facebook Business Suite is for daily posting, messages, and insights (desktop + mobile). Business Manager is for managing ads, Pages, and permissions (desktop only).
How do I connect a Facebook Page to Business Manager?
Go to Business Settings → Pages → Add → Add a Page, then enter your Page name or URL.
How do I access Facebook Business Manager?
Visit business.facebook.com and log in with your Facebook account.
What is Facebook Pixel?
Facebook Pixel tracks what users do on your website after clicking ads. Today, Meta Conversion API is recommended for better tracking.
Visit our page if you need more details.
Also Read:
- What Is Facebook Ads and How Does It Work?
- Facebook Marketing in 2026: A VERY Complete Guide
- 8 Best Social Media Management Tools Reviewed In 2026
- What Is Social Media Marketing? A Complete Guide
- Website vs. Social Media: Which is Best for Your Business? (2026)
- Top 10 Social Media Marketing Agencies in Malaysia (2026)
- 10 Benefits of Social Media Marketing for Businesses
- Digital Marketing Agency vs Freelancer in Malaysia (2026)
- Social Media Advertising vs. Social Media Marketing
Stay Connected: Website | Facebook | Instagram | TikTok | Lemon8 | Xiaohongshu
Share This Article: